Tuesday 26 January 2016

Air combat tactic for air domination (propeller planes)


Air domination used to be a very, very difficult mode to win even for a full squad of good players when it was new, but nowadays it's at approximately BR 4.7-6.0  likely the easiest-to-win match mode for good players. The reasons are the simplicity (no conflicting tactics of base or ground forces bombing) and in the poor tactical behaviour of most red players. Even poor red players are a major threat to most well-flown bombers, but little threat to a good fighter tactician.


First thing to do in an air domination match is to violate rule #1 of War Thunder: "Do not trust in blue players". This bites back at times, but usually it's a successful bet in this particular case. Trust them to avoid a red capture of the objective at the beginning of the match, do not fly towards A. Alternatively, detach but one squad member to prevent a capture (by climbing towards the objective).

Capture is typically possible only at 800-4,700 m altitude (3,000-15,000 ft) in air domination.

Instead, turn 90° to the left or right (preferably towards the sun) and climb at optimum climb rate (usually 20-25° in "F4" view, above 4,000 m /13,000 ft usually 15-20° with WEP. Climb to a commanding height (ideally 2.5 km / 9,000 ft above the reds at A) before you enter air combat. I usually turn towards A no sooner than at 4 km altitude. 

Then always keep situational awareness; distances to reds, counter-climb when they try to attack from above (rope-a-dope; climb till they stall or give up, then dive down to attack them) and avoid becoming too slow (your energy state = potential energy + kinetic energy!). You may then boom 'n zoom (dive, kill, race away or climb again directly) to kill. Prefer targets neither too low nor showing awareness of your threat. The Fw 190A-4 is an ideal plane for this, but I-185, P-63 and particularly P-47 are just fine examples as well. Planes with less firepower, high drag (I-153, A6M etc.) or poor climb rate at medium altitudes are not as good. Your plane should also be deterring; a P-38 or Bf 109F-4 may be easily able to boom and zoom against targets, but red players don't respect such planes and will climb to engage. Sooner or later, this may cause trouble, as you lose energy during every BnZ attack.

Self-discipline is key, for overly aggressive players will waste a lot of energy in BnZ against low-flying red planes and may even find themselves vulnerable to the red furball sooner or later. You should also avoid turning much during BnZ attacks; a historical rule of thumb was to avoid turns greater than 90°. You better abort your attack and climb to safety instead of turning more! The more you turn, the more energy you bleed, and the less likely you will be able to climb to safety afterwards (that's what the proposed 2.5 km altitude advantage is for).

You can also combine BnZ and rope-a-dope in a pair of fighters, particularly if you both use voice chat (War Thunder's or a client like Teamspeak): One squad member counter-climbs when a red climbs for an attack, and while said red player is still focused on him another squad player does a BnZ attack on him from outside his field of view. This yields either a lot of kills or discourages red players from climbing for a challenge, leaving you BnZ attacks on unsuspecting reds below.

You will notice that red players begin to respawn in less capable planes later in the match. You will have missed the bombers among the original spawns (players who didn't pay attention and expected ground strike, I suppose) during your initial climb, but most bomber spawns (save for B-25 and PBJ types) will be around the end of the match - easy kills if you're still ready to kill that late!


It is possible to dominate in an air domination match with a feeling of near-invulnerability in a fast plane, particularly with support from squad mates. This merely takes the right tactic (and absence of major bad luck). One could have expected War Thunder players to be particularly tough opponents in air domination, since nothing but fighters makes sense in there, but the reds (and blues) keep derping, so it's actually an easier mode than ground strike (once ground strike becomes complicated due to heavy bombers at about BR 4.7).

Now do me a favour and forget all this once you see my name (A2A_only_project) in red in an air domination match! In that case, you should preferably stay at fighter spawn altitude and cruise in circles without looking up. Or spawn in a bomber and stay at bomber spawn altitude.
Thanks in advance.


P.S.: "zoom" in "boom 'n zoom" describes the climb phase, not the dive!
Sunday 24 January 2016

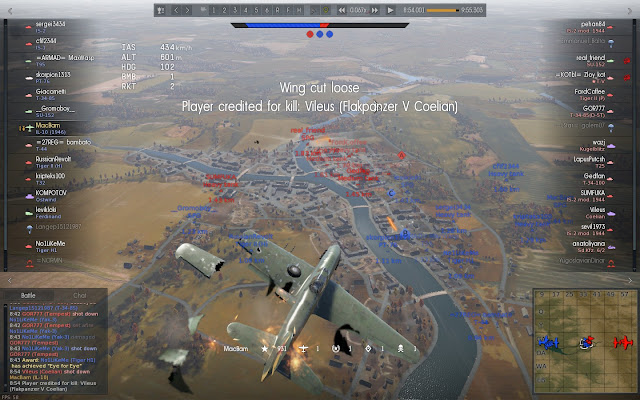
This is why SPAAGs are so unrealistically lethal AAA in ground forces:


They don't need to hit to kill a plane.
They only need to come close!


His first salvo clearly missed, his corrected second salvo hasn't even arrived, but he scored a kill already - by destroying the wing on the far side!

Thursday 7 January 2016

Tank Tactics in War Thunder - Part II


Nothing to do at work, too early for playing WT (don't want to do it too much) - time for some more tank tactics.

(10) Driving around corners
Sometimes - particularly with casemate tanks (tanks without turret like the SU-85) you want to go around a corner, and engage a red tank if there's one. This should be done at high speed, then drift in a 90° turn. This way you'll be a difficult target and face your opponent ready to fire with your strong frontal armour quickly.
An alternative is to do it as tanks with turrets should do: Angle the hull, then drive straight forward. A T-34 angled at 45° will hardly be penetrated during such a manoeuvre. The downside is that you need slightly (maybe tenth of a second) longer till you can shoot yourself.

(11) Slow loaders should fight with a buddy
A slow-loading tank such as SU-152, KV-2, T-44-122 or IS-3 should have a quicker-loading buddy as backup to avoid getting overrun during the reloading time. This applies the most during street fighting.

(12) Learn to drive
Don't position your tank very close to another tank, particularly not if it's one with a slow turret traverse (Panzer III, M10, KVs, Maus). They need to rotate their hull to engage a sudden new contact in the rear, on the left or right in time and you might block that movement if you were too close.

Sometimes two or more tanks fight around a street corner. Make sure you are angled (see (10)) and all of these tanks are well-spaced and in parallel. The one with the thickest armour should be the one on the inside.

Don't drive in the middle of a road or street. In most places there's enough width for a second, faster tank to pass at a higher speed - unless the slow tank player thinks he owns the road and blocks all of it.

Be aware of from where you could be shot. Minimize your exposure. Beginners can be spotted easily by how carelessly they drive. 

Drive on horizontal surfaces whenever possible. Even slight slopes can keep you from shooting at a target, particularly with Soviet tanks (due to their poor maximum gun depression of much less than 8°).

German tanker proverb: Fahren wie das Wasser fließt- drive as water would flow. Don't drive across hills, drive around them! You can easily shoot upwards, downwards is the problem - and you are visible to distant opponents on the top of a hill.

(13) Use hull (and turret) angles
At 45° angle (not facing the enemy directly with your front hull, but standing half sideways) your armour is approximately 50% thicker, at 60° it's approximately 100% thicker. Use this if it makes a difference (particularly with Tiger, KV)!

(14) Have a break if you had a string of very poor matches

(15) Fully automatic fire
With fully automatic fire (12.7 mm/0.50" calibre machineguns up to 23 mm autocannons) don't shoot at tanks. Shoot at their crewmembers instead! You can discover the awesome might of a Pz II with 20 mm APCR (Pzgr 40) with this tactic.

(16) Memorise the weak spots of common opponents
Late model T-34 don't have a weakspot at the driver's hatch, for example. it's actually stronger than the rest of the upper glacis. Shoot the turret instead. Also,a void shooting at the spare track segments on German tanks. They add to the armour plate behind considerably.

(17) Quickly kill a few bots at the beginning of a match to earn a bomber
Then fly it ASAP, before the red team can muster fighters to stop you. Influence the early fight at an objective with your bombs while the first wave of red tanks are still numerous and bunched up. This move can turn a battle onto the path of victory.

(18) Do not use SPAAGs in AB unless they are competitive in ground combat. Bombers can be dealt with by fighter spawns. A good fighter player can stop a bomber almost reliably with a single fighter - even in face of two interceptors.

(19) Don't aim at tanks with plane rockets
Aim next to it, or else your rockets will be super accurate and impact left and right of it. I can't help it that rockets decide to disperse whenever you aim well, though.

(20) Use fighters to kill bombers or interceptors
... until the bombs were dropped. Never ever refuse to protect a bomber and go attacking medium tanks with a fighter! That's left to the idiots.

(21) Seek to fight in hilly terrain in American tanks
American tanks have exceptional maximum gun depression angles (10-12°), they can shoot on slopes much better than others. Sloped terrains are their area of comparative advantage.

(22) Choose your spawn point
A jungle map with objective in the north only and both a southern and northern spawn point has 12-13 players spawning in the south way too often.

(23) Culminating point
The culminating point (of attack) is a term from Carl von Clausewitz and describes the point (or line, time) where or when the attack isn't stronger than the defence any more. This happens in War Thunder ground forces when attackers lost some tanks (repairing and falling behind, get distracted, getting cowardly and stay behind, got killed) and strength in general (lost crewmembers) during an attack, while the defenders are getting respawn reinforcements that arrive quicker than attacker respawn reinforcements.
The northern team often goes past the culminating point on the Kuban map in the southeast; they win at the objective, then push almost to the spawn where they die. The counterattack then usually recaptures the objective.
Avoid this behaviour; instead, be patient and move into a good defensive position to await the counterattack. You may hold out with two tanks till the rushnoobs respawned and arrived.

(24) Have fun with a heavy tank
... and push a smaller tank into the sea on the Jungle map once. It's great fun to see them drowning. 

(25) Be patient in bombers
Take the time to make a good approach (not necessarily from the direction of the bomber's spawn point) if you are in a bomber facing neither SPAAGs nor fighters (any more). You may also take the time and do a full turn to give escort fighters the time needed to shoot up SPAAGs, or turn away from an interceptor at first to give escort fighters the time to deal with it.

(26) Minimize bomber silhouettes and do pitch
Make sure a single interceptor doesn't see the huge target area of your wings. Show him your side, then pitch (up and down, up and down) with your bomber till he passed by. Such evasive manoeuvres are much more helpful than your gunners.

Sunday 3 January 2016

"Security" (tank tactics)


Aside from not driving like an idiot, the core skill that most players in War Thunder ground forces matches are missing is an understanding of security.

I'll explain this concept form military theory:

Think of a fight with two blue tanks on one side of the hill facing two red tanks on the other side of the hill. A few seconds of distraction could be enough to allow the others to win this fight. They are "fixed" in this fight, since running away is no option either.
A red tank could now appear on the left or right side f the hill, and decide the fight with a deadly flank shot.

There are only two options to prevent this, and both would be "providing security" to those involved in the frontal fight:

(1) A 3rd tank looks to the left and provides security to the left flank and a 4th tank looks to the right and provides security to the right flank.
(2) A 3rd tank stays some distance behind, keeps both left and right flank observed and quickly reacts if a red tank appears there.

This security effort does three things:
(a) Absorb the attack, preferably with an effective frontal armour.
(b) Defeat the attack with an effective gun.
(c) Warn the teammates who are involved in the frontal fight (through intra-squad voice chat, map ping, chat commands, or simply noise of shot), so even if (a) or (b) fails, they still stand a chance.

I'm talking about "screen", "guard" and "cover" here, since they apply to War Thunder ground forces matches.

Providing security greatly enhances the chances of a successful attack and a successful defence, even though it is a diversion from the main, front-facing force. It is worth it.
Think of a spear cut in two by a sabre blow from the side. The strength of the point doesn't matter any more if the spear is cut. So don't put all strength into the spear point; make sure you can withstand threats from the flanks!


Now a practical example:
You see two blue tanks 50 m in front of you facing to the left, shooting along a street. You know some red tank could appear 200 m in front of you and kill them with two shots in their vulnerable sides.

The usual behaviour of a WT player is to either join them shooting along the street at the left, racing past them or staying behind cowardly. A player who understand the importance of security may instead decide to stop and get ready to defeat a surprise attack from 200 m in front.
Sometime this would be the less successful option, but usually only so if the two blue players in front of you made the mistake of attacking around the corner when it's not a successful move in itself. That would be their mistake, not yours.


Saturday 2 January 2016

They got how many kills???


I've never before seen a team getting rolled over like this.

5:38 kills. Their team chat would be an interesting read, I suppose.