Wednesday 30 November 2016

VDV


Ever wondered why Gaijin added those stupid ASU-57 and ASU-85 tanks that are clearly post-war vehicles (with post-war ammo), but not in tier 5?

Maybe they thought of adding something like this:


Note how at the 2:00 mark they show how the Russian airborne tanks were landed - with brake rockets igniting few metres above ground.
Supposedly, Russian airborne troops stay in such vehicles during the airborne operation (at least on combat drops)!

Friday 18 November 2016

Super detailed Fw 190D-9 skin


You need to check out this skin:

Focke Wulf Fw190D-9
II./JG 6 , Blaue 12
Fürth , Germany , 8 May 1945

 Disregard the 'outdated due to 1.53 patch' message. The following screenshot was made post-1.53:

The vanilla Fw 190D-9 skin is particularly bad and low resolution, so this one is a great improvement.

Wednesday 16 November 2016

WTF bomb


So I flew squadron battles with LED as LastDingo, and early in the match I announced that the Challenger on the Charlie cap is dead, so rest of team would not waste time or munition on him. I was 100% positive, for my 500 kg bomb was very well-placed and the tank had already stopped behind a building.

Big 500 kg bomb incoming!

Big 500 kg bomb impacts, even scratches the tank!

Big 500 kg bomb exploded. Tank still alive!
 
43 seconds later: That Challenger tank was finally killed with the third 88 mm hit by Crazy.

SC500K
"260 kg of TNT"
"Max armor penetration: 116 mm"
"The radius of destruction of armored vehicles: 11 m"

Challenger tank: Hull front armour is 50 mm, maybe a little more with upgrades, but no way that grows to 117 mm.


And the tank didn't die to this bomb strike.


Bullshit. That's what it is.

Wednesday 2 November 2016

When three players ...

... do 90% of the damage on the ground in a ground strike mission, let me ask the other 13 players: 


Saturday 29 October 2016

Thursday 8 September 2016

BT tank footage


(Some scenes appear to be shown at accelerated speed, though.)

Friday 2 September 2016

Highest points in random match (not event) that I ever saw: 6,247


...I was glad about my points, then I saw I was 2nd with someone over 5,000 points
... and then I looked at the other side! :o

Thursday 1 September 2016

The KV-220 is a beast


... well worth the grind:


It's a heavy tank as it sould be: 
Can penetrate with good effect, is most difficult to penetrate at BR if positioned correctly and albeit slower than mediums it is maneuvering well.

It's a brute force tool; you can fight your path to the objective at your BR.

If used smartly (patiently), it can do much even well above its BR:

 Crucial context: The BR of the match was +1.0 !

Wednesday 31 August 2016

Explain this


Where did the speed drop by upgrade come from until I had the wings and injection updated???

Wednesday 24 August 2016

The tank that benefits the most of add-on armour


... is the Panzer IVH.
My stats with it are atrocious because I used it for warbond and SUMMER tasks and capturing instead of for tank killing first, but it's actually BY FAR the best of the Panzer IV series.

It's also quite good-looking (for a tank) with all that add-on armour.

Those 18 mm track segments aren't anywhere as good as 18 mm RHA,
but the armour thickness is at least nominally close to 100 mm in most places
of the front. Angle this tank by 20° a bit and it's about as tough as a Tiger H1
facing its opponent at a 0° angle.

Historically, this tank was the last quality Panzer IV series. The J series was a low quality design with less rubber, lesser steel quality, no powered turret traverse (hand crank only!). The H series was a real tank, J series was mere cannon fodder, mostly tasked to secure the flanks of Panthers - to die instead of them, since a flanked Panther is as unable to survive as a Panzer(kampfwagen) IV.

Similarly, Panzer IIIN (the III series with 75 mm L/24) were often used to protect the Tigers in the heavy tank detachments and to relieve them of the dreaded scouting duties.


Friday 29 July 2016

On some days ...


THIS


simply is my life in WT ground forces today!

Saturday 23 July 2016

1 year


I forgot: About two weeks ago this blog grew one year old.
Happy birthday and stuff, though still nobody knows you little pet project.
;-)

37:4 WTF


37:4 kills

That's even more extreme than the previous 38:7 kills and 38:5 kills!

Friday 27 May 2016

Fighter engine temperature in AB


Some players believe that engine temperatures in AB contribute to engine damage. I assure you, I flew for 10+ minutes with engine (coolant) temperatures in excess of 300 °C, nothing happened.

There is still a drawback from high engine temperatures that even AB flyers should be aware of:
Some fighters with radial engines manipulate the cooling airflow through the engine with flaps. The P-47 is an extreme example. Sometimes it looks as in the hangar, at other times the flaps are wide open and the diameter of the fuselage is thus greatly increased. The opening of these flaps improves cooling, and increases drag greatly.

So even AB flyers should - if they fly such an aircraft - strive to manage the engine temperature in order to have a faster aircraft that's much better at energy fighting than with a too hot engine block!

Monday 23 May 2016

MaxKayDee (player)


The MaxKayDee ("maximum kill/death" ratio) special project is complete !

101 random arcade air battles*
433 aircraft kills
9 planes lost
48.1 kill/death ratio
61.9 kill/death ratio excluding deaths from collisions
4.3 kills per match on average
116.3 minutes average time of survival
2.4 minutes average time between kills
91 % of matches survived
55.5 % of matches won

My intent was to see what kill/death ratio I can achieve if I focus on it with a new account, including stock planes and rookie crew.

He 112 B-1/U2
Fw 190 A-4
.


I created an account, spent a buck on some gold, purchased the German He 112 B-1/U2 premium fighter since it looked like the best possible German plane to start with (though American Thach's F2A-1 would have been an even better start). The He 112 was meant to research towards the Fw 190, preferably directly to Fw 190 A-4 - and it did. This part actually exceeded my expectations, without a single He 112B-1U2 lost, resulting in a kinda infinite k/d ratio. I learned that I needed to add a 2nd and 3rd plane in order to reduce the BR by one step (2.3 to 2.0), though this should not have been necessary according to widely circulated BR calculation rules. Staying alive in the He 112 was stressful, for it is a turnfighter that faces several faster opponents and the pilot would hardly survive even only a single hit.

Then I switched to Fw 190 A-4 and flew it with great caution (and some kill luck) initially, quickly researching the most vital upgrades. It was in full swing once it got its engine injection upgrade, and with all-stealth ammo the deadliness improved another time at least against fighters.

The A-4 is rated BR 4.3, but most matches I flew as 4.0. I turned out that a 2nd and 3rd plane with BR no more than 1.0 lower were needed to reduce the BR to 4.0, something that was apparently introduced recently. About 10-20 matches were thus flown at 4.3. The Fw 190 A-4 is tier (era) II, so I didn't meet any tier IV opponents. The biggest bombers I faced were B-17E and Pe-8, the best fighters I faced were J2M2, Spitfire IX, Fw 190 A-4, Bf 109 F-4, Yak-9T, Yak-3, Typhoon 1b, Mustang Mk I and P-51.

I knew the A-4 well and like it very much, but staying alive for 79 matches was beyond my ability and luck.

I remember all nine Fw 190A-4 planes I lost as MaxKayDee:

Once an I-185 was diving at me from high altitude and I decided to evade by diving towards the airfield. An I-16 was in the way, but couldn't be hit (I was past 600 kph already, so controls were stiff and the I-16 was dodging). Regrettably, the I-185 was resolute enough to follow me and the airfield defences chose the I-16 as target instead, so I lost a wing when turning in an effort to stay within airfield defences' range. It was a classic "shit happens".

Second, I was stubborn enough to get shot down by a A-20G turret gunner. My bad, approaching from that angle AND staying behind the bomber for so long was stupid.

Almost third; a Pe-8 zombie gunner set me on fire early in an air domination match, I extinguished the (rear fuel tank) fire, climbed with a leaking (forward) fuel tank and then kept sailing till the end of the match. I was at 300 m when the match was over at last.

Third, a Spitfire IIb insta-killed me (likely 20 mm to the pilot) a split second after I scored a P-51 while I was diving with 750+ kph. That was likely a super-lucky shot.

Fourth, I knew a blue P-47 was 1,000 m above me and turned left upwards to kill a P-51 when suddenly that P-47 crashed into me. Blue-on-blue air collision death.

Fifth, a Pe-8 shot me the wing off on first hit, but it was my bad since a botched approach led me into a five o'clock high position where 3 gunners could shoot at me. I never respected the Pe-8 much as A2A even though others on teamspeak expressed great respect for its gunners. Well, there's always a first time.

Sixth, I botched another approach and got into the field of fire of a Ki-49 tail gunner (20 mm) for a split second, and he had his lucky day.

Seventh, I was chased to the blue airfield by a Typhoon and another plane. The airfield defences killed the other plane, and I shook off the Typhoon (which has a poor roll rate and seemed to reload) with scissors - only to crash into a mountain next to the runway soon thereafter. The looking left and right during scissors combined with the loss of speed left me unable to dodge that mountain.

Eighth, A J2M2 chased me (and was to my surprise faster), caught up and after a lengthy dogfight it defeated me in a honest 1-on-1 (which it started ~2 km behind me at equal energy, though). As usual, I wasn't all that great in scissors, the only manoeuvre a Fw 190 A-4 is better at than a BR 1.0 lower J2M2. I had merely one split second chance to hit it and missed.

Ninth, I was engaging a fighter during a shallow dive at 750+ kph when suddenly a blue He 112 appeared out of nowhere in front of me and crashed into me. I couldn't have dodged it even if I had seen it somewhat earlier, since the controls are too stiff at that speed.

I lost no plane during the last 15-20 matches.


Tactics and principles with Fw 190A-4:

Turn 90°, climb at 25° to 4 km, then turn towards reds while climbing at 20° to 5 km and possibly at 15° beyond. Preferred targets were bombers and attackers (other than B-25, PBJ and later also A-20G and Pe-8) from their weak (no or minimal resistance from gunners) angles. I actually killed a lot of B-25s, but always with extra caution.

Fighters were killed preferably with Boom-and-zoom, sometimes with Rope-a-dope. Head-on kills against fighters were very rare, but sometimes I was forced into such an encounter. I sought head-on fights only against opponents with at most two light machineguns facing me. I largely avoided getting shot at by more than two light machineguns or one heavy machinegun in any situation. My planes usually finished the battles with no damage displayed.

Repairs on runways were only done if absolutely necessary. I had to repair only two or three times and finished one match as a glider without fuel. I never captured a runway.

In de facto lost matches (such as 3 blue planes left facing 8-12 red planes) I either withdrew or -if possible- kept fighting with energy advantage (above the reds).

On domination maps with multiple airfields I tried to stay close to the "blue" airfield, especially if it was the farthest from the red spawn point. Red fighters would typically be distracted and low there.

My aim usually was good enough for a kill on first pass, I estimate about 80% of targets were killed in one pass and a ratio of 9:1 in terms of kills and assists. Both fighter types have above average firepower at their BR.

My gun convergence range was 500 m in both planes.

When in trouble:
(a) run away if fast enough
(b) defensive spiral
(c) scissors (especially against P-38, Spitfire and Typhoon since they roll slower)
(d) run to blue fighters for help
(e) run to blue fighter spawn point for help
(f) run to blue airfield for (AAA) help
(g) head-on fight with opening fire at 1.3-1.5 km and evasive manoeuvre beginning at 0.8-0.9 km
(h) if pursued by a turnfighter: dive and run

I estimate I fed the airfield defences about 10-15 red fighters, none of which were counted as my kills, of course.


Screenshots:


Crew level stayed below 30, so no acing was possible.

The long reload time of about 26 seconds was a pain in the butt,
and it was even worse early on in the He 112.

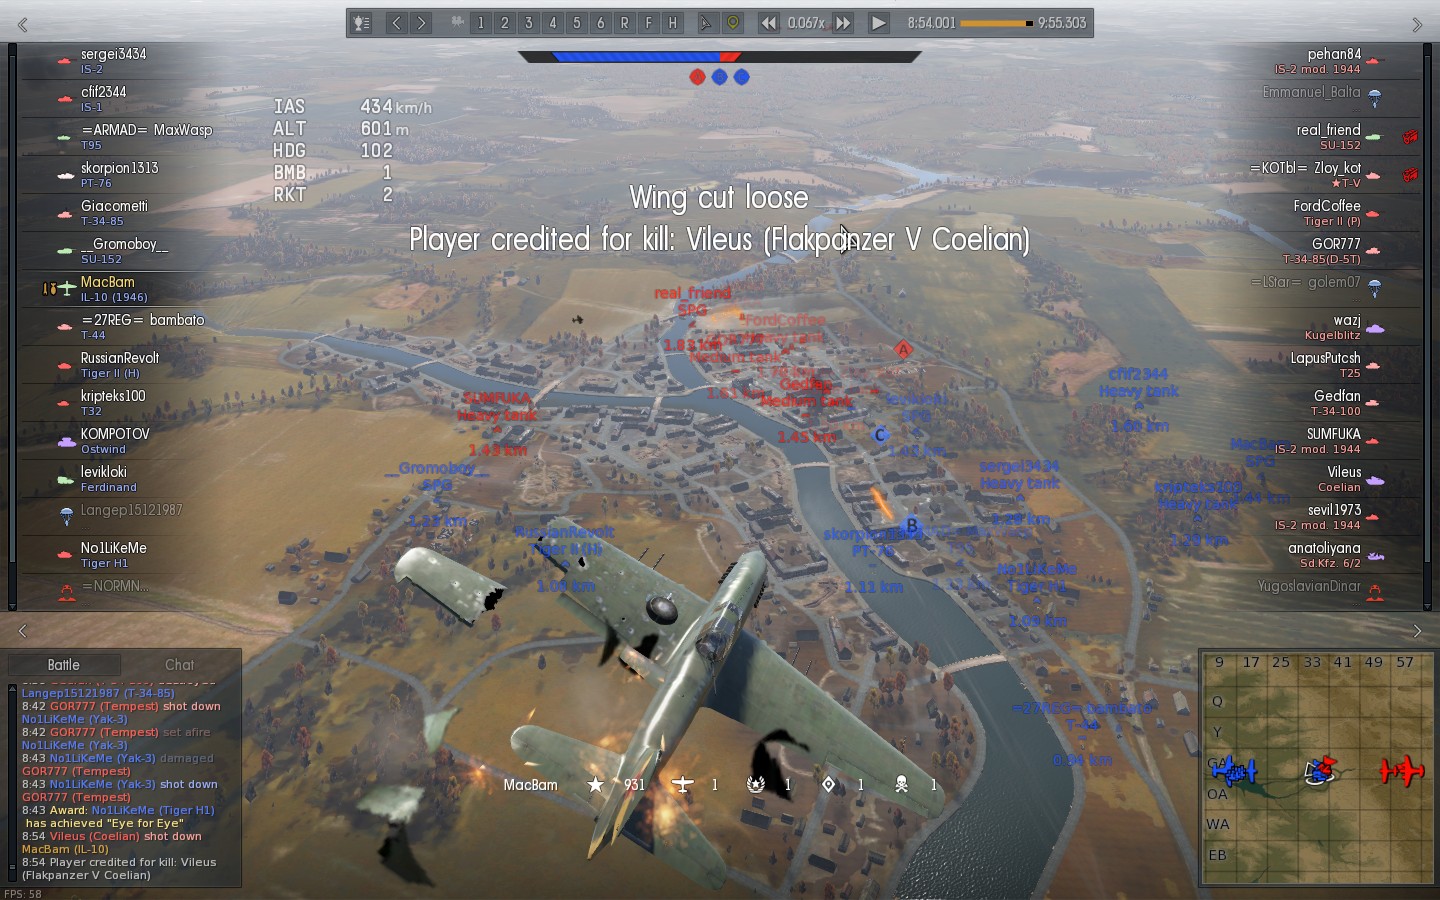
The final match. All I wanted was to not lose a 10th plane,
but it turned out to become the match with the most kills!

On the 99th match once again a squad got obsessed with chasing me in vain.
I only scored a single kill that match, but I neutralised 3 red players for long.

*: 101 matches is as far as I know the minimum for a leaderboards entry.  I will add the leaderboard screenshot once the leaderboard is updated
 __________________

The leaderboard stats are out, and MaxKayDee unintentionally achieved a top 100 place for air kills per session (all time):
kills per session is almost the same as kills per match in the case of MaxKayDee
Sadly, there's no k/d leaderboard category. I'd like to see who (with 100 or more missions) achieved a higher k/d ratio, and with which planes. I guess it could be done with the Ki-45ko, but how to get to it without losing a couple Ki-10?

Sunday 22 May 2016

Gun convergence


I recommend that link, it says almost everything.


I tend to set convergence as follows:

Fighters with wing-mounted 7.7 mm only: 300 m

Su-2 / BB-1: 400 m (for ground attack mostly)

Most fighters with 20 mm main guns: 500 m (I used to set it to 400 m for a long time)

MiG-15bis: 800 m (only to influence vertical drop)

I had it set to infinite when I was trying to score kills head-on at past 1,000 m in the duel tournament.

Bomber destroyers like the G-6 or G-10 can spray and still kill. Vertical drop compensation is more important than horizontal convergence with them. 600-800 m makes most sense for them, since infinite doesn't compensate for vertical drop and the low muzzle velocity almost forces you to shoot only at less than 800 m.


Friday 13 May 2016

Two years


On 13 May 2014 I began playing War Thunder.
Oh boy, imagine I had spent that time productively!

Sunday 8 May 2016

MaxKayDee


I'm flying rarely these days, and mostly as MaxKayDee, which is an account made for but one purpose: Try to get the maximum possible (for me) k/d ratio into the leaderboards (100 matches).

By now it's obvious that I can't get a flawless record.

I didn't lose a single He 112 premium plane (two bucks worth) en route to the Fw 190A-4, but I failed to stay alive in the A-4 three times already (in a total of 49 matches in the account so far).

Once an I-185 was diving at me from high altitude and I decided to evade by diving towards the airfield. An I-16 was in the way, but couldn't be hit (I was past 600 kph already) and sadly the I-185 was resolute enough to follow me and the airfield defences chose the I-16 as target instead, so I lost a wing when turning in an effort to stay within airfield defences' range. It was a classic "shit happens".

Second, I was stubborn enough to get shot down by a A-20G turret gunner. my bad, approaching from that angle AND staying behind the bomber for so long was stupid.

Almost third; a Pe-8 zombie gunner set me on fire early in an air domination match, I extinguished the (rear fuel tank) fire, climbed with a leaking (forward) fuel tank and then kept sailing till the end of the match. I was at 300 m when the match was finally over.

Third, a Spitfire IIb insta-killed me (likely 20 mm to the pilot) a split second after I scored a P-51 while I was diving with 750+ kph. That was likely a super-lucky shot.


Well, long story short: If you see MaxKayDee in a match don't chase me, please. You're most unlikely to kill me anyway. I usually get uncomfortable by reds that are 3 km away already save for the ones I'm intending to engage. :-)
 

Friday 15 April 2016

Dodging hits in air combat as a fighter


Most players use hardly any effective evasive manoeuvres during air combat. They simply tolerate that they'll be shot down soon.

I knew a clan leader of a really, really good ground attack-focused clan whom I couldn't convince that flying horizontal circles is no good evasive manoeuvre - particularly while I was diving on his pursuer.

So a few days ago it happened that someone was on my tail for six minutes 50 seconds, 4 minutes 40 seconds of which he was within range, shooting - and not killing me. My total damage to his 20 mm gun, two 15 mm guns and two 7.92 mm guns after almost five minutes was one main landing gear leg shot off, the oil cooler hit and light damage on my left wing.

I love it when they accuse you of cheating. Being accused of using a survival bot is a first for me, though!
Initially I tried to defeat him with scissors, but (I'm still not great at it) the near misses became uncomfortable and I decided to build up speed in a dive again. After about two minutes of being shot at I came to the conclusion that he's really bad at aiming, and just kept dodging his shots while flying towards blue fighters. It was really safer than aerobatics would have been. Such poor shots often choose to ram you if you try fancy tricks.


Some general observations on dodging shots from behind, as a fighter:

- the tracers allow you to identify some planes. You can tell whether the guns are wing-mounted (and tracers crossing), for example. You may also notice whether you're in front of or closer than his gun convergence range.
- you can hear whether he's got a big calibre gun (37-45 mm)
- if the tracers miss you left, turn to left. If they miss right, turn to right. Your correction will be the opposite of his correction of aim this way.
- if you want to try fancy aerobatics, do so while he's reloading. You may notice this when the tracers from 20 mm shells stop 
- know the planes. A Spitfire Ia spraying lots of 7.7 mm bullets at 500 m distance is not much of a threat if you have an armoured pilot's seat. In such a case you should probably try to be really fast with little dodging to avoid him closing into effective range.
- fly towards safety if possible (either in front of and below the blue fighter spawn point or at your defended airfield at less than 2,000 m altitude, preferably even lower)
- you may find a mountain to disappear behind, which allows you to do a turn or other manoeuvre of usually high risk while being impossible to hit
- to fly evasive manoeuvres usually means to have mroe drag and thus be slower than your pursuer. That's why you'll have difficulties getting away even from slower fighters when you need to dodge much
- avoid showing a large silhouette, such as a Spitfire's wing
- be unpredictable
- avoid becoming very slow
- pick up speed while he's reloading cannons
- you may attract blue fighter pilot's attention (and thus possibly some help) by shooting with tracers (assuming you got tracer ammo, which you usually should get rid of ASAP if possible except in some American planes)
- the worse their aim is, the greater the risk that you'll evade INTO a shot that would have missed you

Tuesday 12 April 2016

Mute it


... or use push-to-talk.

I have the let shift key as push-to-talk key. It doesn't mess up the chat window when used and is close to WASD, to be used by the small finger that's not needed on WASD.


The worst offenders I've ever met in War Thunder were British people, by the way. One was literally watching TV, loudly eating dinner and playing WT at the same time. This dosage of disrespect for squadmates was enough for the blacklist.

Monday 11 April 2016

The Mk 108


Mk 108 - that designation stems from "Maschinenkanone 108". The figrue has no special meaning. All items developed for the German aviation ministry received a numerical code, and few figures were re-used. Mk meant Maschinenkanone, MG meant Maschinengewehr and otherwise the letters in front of the figures were usually telling about the company or lead designer (similar as with the Japanese navy: A6M = naval fighter, sixth, Mitsubishi).


Most of the sounds in these videos are fake, for gunc ameras had no audio recording. Only a handful of dedicated recordings for propaganda and training purposes may have had audio recording, but I doubt it.


Concerning the Mk 108 in War Thunder:
Its shell is very, very slow and low density. You need to lead aim much farther forward of the target than with 13 or 20 mm guns, and this is important to know since all Mk 108 users but the Me 262 series have mixed armament.

The lead target indicator in AB mode will always be for the biggest calibre that's ready to fire. In a mixed 30 mm + 13 mm armament, it will be for 30 mm. In mixed 30 mm and 20 mm armament it will be for 30 mm, period. The other guns need less lead in deflection shooting, which means that with mixed armaments you better do not aim far forward (such as at the pilot of aB-17) with the Mk 108, but instead a little less forward than you otherwise would. This gives your other guns a better chance to hit at least the tail. This matters the most against the short fighters, obviously.
Even better, hold back your 30 mm fire until at about 500 m, and then one long burst for the kill, break.

You won't need the 30 mm gun pos on the Bf 109 G-6/-10/-14 to kill if you can aim well. They're awfully heavy anyway. It sure is delightful to see just about every target disintegrate in a huge explosion after but a short burst, but a single gun really is much better for survival.

Remember that a low muzzle velocity weapon such as the Mk 108 requires that you aim rather high at long ranges, such as in head-on engagements (which you really should avoid if possible) or generally at ranges 600-1,200 m. I don't think more than 800 m is practical with Mk 108 even in AB.

Sunday 10 April 2016

NACA Report No. 868


A report from NACA (predecessor of NASA) on flying characteristics of several WW2 fighrter planes. I once sent this to Gaijin because the Spitfire's roll rate was (and still is) appalingly and ahistorically poor (except the XVI version).

Wednesday 30 March 2016

I swear, many WT players think they are like this


They aren't. 

A player could do amazing aerobatics with the I-153P "Chaika", but then again, air combat isn't much about aerobatics!


Relevant manoeuvres are in my opinion:

Boom and zoom (dive, shoot, pull up)

defensive spiral (to avoid getting hit by someone trying BnZ on you)

Scissors (if nothing else works and you don't roll slower than your pursuer)

Rope a dope (enjoying altitude/energy advantage, you lure him to climb up to you, counterclimb, then dive on him when he's very slow and shoot)

wingover (very rarely, and usually as part of a rope a dope)

loops (if your plane is MUCH better at vertical manoeuvres)

Immelmann (not in a fight, though)

barrel roll attack (primarily useful if your target is distracted)

high yo-yo (primarily if you'd overshoot your target otherwise)

Split-S (if a quicker pursuer forces you into a dogfight when you are slow)


By far the most common techniques used by me in air combat against fighters are BnZ, rope-a-dope and simply attack with advantage of surprise. I rarely need to use the other abovementioned maneuvers.

Beginner pilots should understand rope-a-dope and stop falling prey to it.
They should also learn to simply wobble around and flee to the blue spawn or blue airfield defence  (at low altitude) if they have a comparable fighter on their tail.
Pay attention and don't fly in a straight ling when in a bomber under attack.
Withdraw after surviving a dogfight and look around (regain situational awareness) instead of continuing to dogfight at low energy in a furball.

Learn BnZ once you learned to hit something in the air, and reliably so.

Most importantly, learn to pay attention to your surroundings.


Tuesday 22 March 2016

French vehicles


I suppose France deserves (and will get) a tree of its own sooner or later in War Thunder. Those few D.520 and D.521 in the British tree are but a start.

The really interesting planes will be Bloch M.B. 157 (a P-47D equivalent), M.B. 162 (a faster B-17 equivalent), M.B. 175 (Pe-2 equivalent) as well as the Potez 631C3 (another Bf 110C equivalent).

Meanwhile, they had a huge quantity of interesting tanks up to 1940, with plans sufficient for tanks competitive up to 1942 and later on they used U.S.-made tanks, followed by French post-war designs including the unique AMX-13 light tank.

Here's a wonderful website on French tanks, best if you can read French:


Wednesday 9 March 2016

The 100 deathmatch event and its exploiters


So there were two accounts with less kills than matches in that event, and they qualified for the top 300 free premium plane prize.
One of them scored only 8 kills in 84 matches, "improving" to 60 kills in 325 matches and later 257 kills in 355 matches.

You could "achieve" these stats (60/325) by having nothing but a bomber in your deck, then joining the queue and not doing anything else. The server would force-spawn you with the plane after a while in the match, the gunners would rarely kill some red plane and since you'd be force-spawned several times per match and fly straight forward to the reds, you'd end up having a kill once in a while.

So I suspect these accounts were rewarded for what was mostly or exclusively bot activity. I reported it in the forum and next time I went there to look for replies the topic was deleted, with no pm in my account.


This is some serious nonsense, but somewhat representative of Gaijin's design of competitions and events.

Do you remember the torpedo bomber event which allowed Beaufighters and B7A2s in? OF COURSE players used them to slaughter the Beauforts, Il-4s, Wellingtons and TBFs! Gaijin later removed the Beaufighters, but never removed the B7A2s. 

Gaijin is great at 3D models, fine at textures design and the ingame voice chat works surprisingly well, but they fail in too many things involving a requirement for logical thinking or anticipation of exploitative player behaviour.


Monday 7 March 2016

Kick the instructor out! / How to capture airfields


Newbies have difficulties capturing airfields in Domination air matches. The reason is that they either approach at very low speed and get shot down or they attempt to touch down at high speed as do the experienced pilots - and crash.

The reason for the latter is that they have the "instructor" active, a ghostly AI instructor pilot sits in your back and when you approach the ground at high speed he pulls up, so you push down even harder and he pushes down even harder. At some point you either give up or crash.

Kick this instructor out - it has no usefulness whatsoever. You won't miss him.

Go to menu, then controls, then instructor and simply switch all those useless options to "off".


Other tips about capturing airfields:

Floatplanes and flying boats can capture by skidding over the runway at slow speed. They get a flying start after repairs.

Dive bombers can capture airfields by surprise. They pretend to be irrelevant at 2+ km altitude, then dive, brake with dive brakes, landing gear and flaps and touch down for the capture or at least neutralisation.
Forget the B7A2 for this, though; its undercarriage springs make it too bouncy.

You cannot capture an airfield if hostile ground forces (or non-repairing red aircraft) are on it. Kill tanks (or AAA, armored cars) in time!

Su-2 and BB-1 are close to useless for capturing airfields, which may be relevant on Krymsk at low battle ratings because these are really good attackers. You need to slow down to 140 kph to land these planes without propeller damage. A landing attempt means the loss of the plane, even if successful.

Some airfields are bouncy or have obstacles. There's a walled machinegun position on Korsun airfield, some flag poles and other obstacles are on other airfields. Keep your eyes open!

If the match is close and a red player is about to capture an airfield don't chase to kill him. Instead, lower your landing gear and manoeuvre to land yourself to recapture the airfield right after he takes off again (or dies).

You can capture an airfield not only along the runway, but often also obliquely - particularly with slow planes such as biplanes.

Turnfighters (I-153, A6M, Ki-43 etc.) are fine for guarding and recapturing an airfield. They can stay low and close to the airfield.

American fighters (P-51/Mustang, P-47) lower their landing gears very slowly. Keep this in mind if you fly in them.

What matters is that you roll with a single wheel or slide on the ground. More wheels are optional. A P-38 with destroyed main landing gear can capture with its front wheel, for example.

You are immune to collisions while rolling on an airfield, but not once you're airborne again. Watch it! You may collide immediately if you pull up at the wrong moment. This is particularly important at the beginning of a match when often 3-5 players try to capture a single airfield.

A capture of an airfield is worth 300 points. That's more than an aircraft kill. This is very recommended for fast stock planes.

Repairing aircraft do not defend an airfield (AFAIK), but they may deceive red players to believe so (or entice them to kill instead of touching down).

On the Britain domination match it's recommendable to capture moving into the direction of the blue spawn point, and at the blue side end of the very, very long runway. You may also decide a very close match in your favour there if you roll around at 'your' end of the runway. The reds cannot capture the runway while you roll there and survive.

About Peleliu:

Two things: Best winning tactic for a squad of four is to rush the 'hostile' airfield at the beginning. This badly disrupts their start of the match and usually wins the entire match if you succeed to capture it. Use chat commands to call for others to do the same!
Second, the Southern (crosswise) airfield is much more difficult to defend because it can be captured from many more directions.

Saturday 27 February 2016

"Best Squad"


This must be the minimum effort necessary for "Best Squad" !

Bombing


Newbies and noobs


Newbies are new players who are inexperienced and haven't 'automated' their actions yet (akin to a driving student who's already overburdened while slowly driving without listening to music or having a conversation at the same time).
I help them once in a while, with tips about instructor/speedcap, rope a dope, boom and zoom, combat flaps, victory conditions, battle rating management, optimum angle of climbing, choice of ammunition, gun convergence and so on.

Noobs on the other hand aren't the same as newbies at all; noobs aren't new, but resistant to improving. Some noobs have level 60-100. They tailchase an Il-28 just as stupidly as they tailchased B-25s. They seek head-on fights against superior fighters, fly their bomber straight while under attack without using manual gunnery, spawn in wrong spawnpoints, park their tank behind your tank when you predictably need to withdraw backwards soon, bomb minibases instead of tanks, fight in the streets against superior red tanks instead of waiting behind a building for a flank shot on an advancing red tank, drop lines of nine 500 lbs bombs obliquely to a convoy of AI tanks, dive into an overwhelmingly red furball to join the turnfighting there in a BnZ fighter, spawn PBYs in air domination, join ground strike missions with torpedo loaded in their bomber and so on.

Noobs are shit. Their only justifications for their existence are that they are fodder and decoys for good players and some noobs help fund the devs by buying stuff with real money.

Thus I hope you will help newbies.
Meanwhile, punish the noobs.

Tuesday 23 February 2016

Craziest air battle in a while


So I was flying the USMC F4U and meant to intercept bombers at about 4,000 m when I saw the most crazy thing of the day (till then):
A red Blenheim climbed up to engage a blue B-25, it even helicoptered (slowed down to a stall while still pointing its nose up)! It did indeed survive this, and kept bugging that B-25 for a whole minute as if it had no gunners.

Later that same match I saw a certain message for the very first time after thousands of matches:
"A player of your team landed on an enemy airfield and surrendered" in big white letters at the bottom of the screen.
WTF???

Oh, well, and the match was notable for another weird thing: All incoming bombers seemed to be Wellingtons, and all of them seemed to chip away a bit more of my engine, hitting no other part of my Corsair, ever.

And last but not least: Heavy AAA kept shooting at my fighter at 5,000+ metres altitude even while it got bombed by actual bombers at low level. It felt like focus fire by heavy AAA whenever I was remotely in range of it.

So much crazy stuff, I got so very much confused and distracted that I needlessly accepted two head-on fights with a Spitfire IIb (both 0-0 with minor damages due to evasive manoeuvres after my initial burst).

Tuesday 9 February 2016

Dive toss bombing


So you spawned in a bomber (or PBJ) in an arcade ground forces battle and see no chance surviving the many red interceptors that spawned as well? I get ya, particularly the Wellington is of very little use in such a situation.

There is one tactic that may still allow you to kill red tanks in that sortie, though: Dive toss bombing.

a depiction of a real world toss bombing manoeuvre

You retract the flaps if they're lowered (which they often are for no good reason) to reduce drag. Pitch down the nose to pick up speed. Once you're fast and close enough (based on experience), you pull up again into a not too steep climb. (Side benefit: The aim of fighters will be somewhat degraded by this manoeuvre.)

There will be the bomb impact circle symbol on the ground well ahead of you. Much farther ahead than if you were flying level. Maybe it's obstructed by your plane, in which case you should switch to "F4" view.
Now preferably aim at a group of red tanks that are bunched up or depicted in a (vertical) line. Quickly drop your bombs on these.
Next, press "J" to leave you bomber ASAP and resume playing tank before your tank gets roasted. Your bomber is of no use any more.

The bombs may very well be in the air for so long (doing their whining sound) that they'll detonate instantly on impact. This means stationary tanks won't escape by driving away, which partially compensates for the inaccuracy of the hurried tossing.

It's advantageous to be a skilled War Thunder plane pilot, even in War Thunder ground forces!


(Toss bombing was originally meant to allow subsonic aircraft to deploy powerful nuclear free-fall bombs without damaging themselves too much. The tossing increases the distance and the time till explosion.
Toss bombing was also used during the Falklands War for a low risk attack of Sea Harriers against the well-defended Port Stanley airfield. It can also be used to accurately attack a target with a guided bomb, as shown in the illustration above, if only the guidance method doesn't depend on the bombing plane itself having a line of sight to the target during the bomb's terminal approach to the target.)

Template change


I changed the template to another, simple one. The old template stubbornly refused to display the blog archive and labels on the right, left or just about anywhere.

Wednesday 3 February 2016

Inconsistent bomb effects in AB ground forces


I got used to ignore the ineffective 100 kg bombs of Il-2 and 50 or 60 kg bombs of Ju 88A-4 and D3A, but this is new:

Four 500 lbs bombs of Havoc were dropped on one StuG, super accurate.


This explosion was survived. One metre ahead at most.

Tuesday 2 February 2016

The scissors manoeuvre


I can't recommend this video enough:


The scissors are one of the few things in WT that I didn't figure out myself how to do right.

Essentially, this allows a good Fw 190A-4 player to beat a median Spitfire IX player at low altitude even if the latter begins the fight with equal energy 600 m on the Würger's tail. Well, at least more often than not.

It was also one of the reasons for why the Fw 190A-2 demolished the Spitfire Vs back in 1941/1942 so badly (the 190 rolls much better than Spits both in reality and in WT, and this is key in the scissors).

(this illustration doesn't quite show the beginning right; the attacker starts behind the defender and approx. at same altitude and speed)

I rarely used a similar tactic in such situations in AB air; lower landing gear, landing flaps, power to 0%, move erratically - all hoping that the attacker overshoots me before killing (and without ramming) me.
Oh boy, they raped me when I tried this in the 1vs1 duel tournament. So I did attempt the scissors instead in such situations, and the result wasn't much less terrible against players rated better than 250th place.

What I hadn't understood back then was the real key to success with scissors: You want them to overshoot, but you don't want to drop more in energy than they do. This means in WT AB practice that you need to climb -unnoticed by your opponent at first- more than him. This way you store more of your equal energy in potential energy, less in kinetic energy - which means he's faster and flies past you (with the option of crashing into you).
So don't use this if he's slower and above early on, or if his plane rolls better.
When you do the scissors manoeuvre do roll at about the same time as him, but always try to climb a bit more. With really, really well-rolling planes you may minimise your silhouette when he gets a snap shot at you (by rolling such that he doesn't have your wings as hit area except in front of your fuselage).

Tuesday 26 January 2016

Air combat tactic for air domination (propeller planes)


Air domination used to be a very, very difficult mode to win even for a full squad of good players when it was new, but nowadays it's at approximately BR 4.7-6.0  likely the easiest-to-win match mode for good players. The reasons are the simplicity (no conflicting tactics of base or ground forces bombing) and in the poor tactical behaviour of most red players. Even poor red players are a major threat to most well-flown bombers, but little threat to a good fighter tactician.


First thing to do in an air domination match is to violate rule #1 of War Thunder: "Do not trust in blue players". This bites back at times, but usually it's a successful bet in this particular case. Trust them to avoid a red capture of the objective at the beginning of the match, do not fly towards A. Alternatively, detach but one squad member to prevent a capture (by climbing towards the objective).

Capture is typically possible only at 800-4,700 m altitude (3,000-15,000 ft) in air domination.

Instead, turn 90° to the left or right (preferably towards the sun) and climb at optimum climb rate (usually 20-25° in "F4" view, above 4,000 m /13,000 ft usually 15-20° with WEP. Climb to a commanding height (ideally 2.5 km / 9,000 ft above the reds at A) before you enter air combat. I usually turn towards A no sooner than at 4 km altitude. 

Then always keep situational awareness; distances to reds, counter-climb when they try to attack from above (rope-a-dope; climb till they stall or give up, then dive down to attack them) and avoid becoming too slow (your energy state = potential energy + kinetic energy!). You may then boom 'n zoom (dive, kill, race away or climb again directly) to kill. Prefer targets neither too low nor showing awareness of your threat. The Fw 190A-4 is an ideal plane for this, but I-185, P-63 and particularly P-47 are just fine examples as well. Planes with less firepower, high drag (I-153, A6M etc.) or poor climb rate at medium altitudes are not as good. Your plane should also be deterring; a P-38 or Bf 109F-4 may be easily able to boom and zoom against targets, but red players don't respect such planes and will climb to engage. Sooner or later, this may cause trouble, as you lose energy during every BnZ attack.

Self-discipline is key, for overly aggressive players will waste a lot of energy in BnZ against low-flying red planes and may even find themselves vulnerable to the red furball sooner or later. You should also avoid turning much during BnZ attacks; a historical rule of thumb was to avoid turns greater than 90°. You better abort your attack and climb to safety instead of turning more! The more you turn, the more energy you bleed, and the less likely you will be able to climb to safety afterwards (that's what the proposed 2.5 km altitude advantage is for).

You can also combine BnZ and rope-a-dope in a pair of fighters, particularly if you both use voice chat (War Thunder's or a client like Teamspeak): One squad member counter-climbs when a red climbs for an attack, and while said red player is still focused on him another squad player does a BnZ attack on him from outside his field of view. This yields either a lot of kills or discourages red players from climbing for a challenge, leaving you BnZ attacks on unsuspecting reds below.

You will notice that red players begin to respawn in less capable planes later in the match. You will have missed the bombers among the original spawns (players who didn't pay attention and expected ground strike, I suppose) during your initial climb, but most bomber spawns (save for B-25 and PBJ types) will be around the end of the match - easy kills if you're still ready to kill that late!


It is possible to dominate in an air domination match with a feeling of near-invulnerability in a fast plane, particularly with support from squad mates. This merely takes the right tactic (and absence of major bad luck). One could have expected War Thunder players to be particularly tough opponents in air domination, since nothing but fighters makes sense in there, but the reds (and blues) keep derping, so it's actually an easier mode than ground strike (once ground strike becomes complicated due to heavy bombers at about BR 4.7).

Now do me a favour and forget all this once you see my name (A2A_only_project) in red in an air domination match! In that case, you should preferably stay at fighter spawn altitude and cruise in circles without looking up. Or spawn in a bomber and stay at bomber spawn altitude.
Thanks in advance.


P.S.: "zoom" in "boom 'n zoom" describes the climb phase, not the dive!

Sunday 24 January 2016

This is why SPAAGs are so unrealistically lethal AAA in ground forces:


They don't need to hit to kill a plane.
They only need to come close!


His first salvo clearly missed, his corrected second salvo hasn't even arrived, but he scored a kill already - by destroying the wing on the far side!